20 November 2009


This was a really fun card to create. It is a wiper card and there are several video tutorials online if you want to make your own. I used Archiver's Dark Green cardstock for the main card body and the patterned paper is from K & Company it is their Peppermint Twist mat stack (I love this paper collection) and the stamped image is from Close to my Heart's "Gloria" stamp set. The nativity image is cut out with Spellbinders Nestaibilities Deckled edges set and the mat is cut with Nestaibilites scalloped Rectangles.

Here is the card completely open and you can see the edge, created with the EK Success snowflake border punch and the pop up is stamped with a Hero Arts stamp.


A view of the card as it starts to pop up.


A sneak peak of the inside.

You need to make one of these wiper cards they are really fun!!

I am finally back and ready to share the birthday card I promised. This card was created for a very good friend of mine, she loved it. The card itself is made with light blue shimmer paper from The Paper Company and the patterned paper is from the DCWV Citrus stack, the stamp is a Stampendous Cling "Changito Driver", the jewels are Sparkles from Close to my Heart and the ribbon is from Bo Bunny, their Cottage Kitchen collection. The sentiments (both inside and outside) are computer created. I really loved the way this card came out, I think it is super cute. I colored the image with copic markers and Sakura markers (the glitter) and then I used Close to my Heart Liquid Glass to give my car a clear coat (just like a real car LOL) I cut out the stamped image and the mats with Nestibilities Large labels.

The inside view.

10 November 2009

Ornaments


Ok, so I fibbed, the birthday card will be (maybe) tomorrow, it is still living on the camera card and since I am on my way out of town for a few days, I will have to get it online later, sorry. I made this card using Our Craft Lounge's "Jolly Ornaments" clear stamp set. I do like it but, have to do it over again I would have stamped the ornaments and then embossed them. I stamped the ornaments with Momento Red ink and then used Sakura Stardust pens to add the green. The Merry Christmas stamp is from OCL "Jolly Ornaments" set as well and is stamped with Versamark ink and embossed with gold embossing powder. The jewels are from my stash (I need to quit taking everything out of its packaging so I know who makes it) and I used a Sharpie fine line marker to draw the "cords" for the ornaments and to add the small dots. The card is white cardstock with a mat of the Archiver's red. This card is nice a blingy (is that a word? LOL).

08 November 2009

Santa Clothes line (again)


I just love this stamp, it is called Santa's Laundry and I just love this stamp! This card is one that I saw a sample of at Archiver's and they got the idea from the Northwoods Rubber Stamps Company (the maker of the stamp) This card is an A9 card (8.5 x 11 paper folded in half) I used some dark green cardstock from Archiver' for the card itself and a piece of the Archiver's red cardstock for the large "mat", the black belt is made with some black cardstock from my stash and the gold glitter "buckle" is from a sheet of gold glitter paper I bought at Hobby Lobby. The black center is embossed with gold embossing powder with a "believe" stamp from Our Craft Lounge's "Reindeer Kisses" set. The white glitter "fur" is some white paper I patted with the glue pad and then glittered with some Prisma Crystal Glitter, it was easy to make my own glitter paper! I colored the stamped image with Copic markers and cut it out and attached it to the card with popdots. Tomorrow card is a Birthday card, we will take a quick break from Christmas! LOL

07 November 2009

Let it Snow


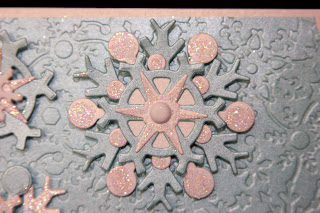
I love this card! It was actually very easy but time consuming because of glitter drying time. I made the snowflakes first they are made using the Spellbinders Shapeabilities Snowflake (this was NOT the new snowflake ones that are designed to be put together but that is where I got the idea!) I chose to use white and blue shimmer paper for the snowflakes and then used the white shimmer paper as the main card and the blue shimmer paper, embossed with the Cuttlebug and Spellbinders Snowflake Impressability embossing plate as the background paper. I used a circle punch to invert the corners and the sentiment is stamped on white stamping paper using a glue pad and then glittered with Martha Stewart glitter that closely matches the blue shimmer paper. I added crystal glitter to the snowflakes on the while parts using a glue pen and some Prisma Glitter. The small snowflake is held together with a snowflake brad and the two larger snowflakes are held together with white brads from making Memories. I attached the snowflakes using popdots.

Here is a close up view.

06 November 2009

O Come Let Us Adore Him


I have said that I am really trying to challenge myself and this card is one of the results. I love the way it turned out. The Stamp Set is the "Let Us Adore Him" stamp set from Close To My Heart. The card itself is Antique Gold shimmer cardstock from The Paper Company and the patterned paper is from Basic Grey's Wassail 6x6 paper pad, the green cardstock is from Archiver's and the white is the white stamping paper I get from Stamper's Paradise in Marietta, GA. I stamped the image and the sentiment in Versamark Dazzle ink in Champagne and embossed it with Zing embossing powder in Brownie (color), by American Crafts. The ribbon is by Making Memories, it is from a 9 color selection card in Celery. I also stamped a sentiment on the inside of the card, all of the stamps are from the "Let Us Adore Him" stamp set. Please don't for get to leave comments, either here, Facebook or email me. I love to know what you think. My email is otrbanks@earthlink.net, just put blog in the subject line. Have a great crafting day!!

05 November 2009

Santa's Laundry


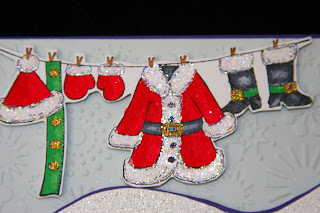
This is a super cute Northwoods Rubber Stamp, "Clothes Line" that I picked up at Archiver's in Kennesaw GA. I created this card by stamping the image with Momento Tuxedo Black ink and coloring it with Copic markers, I glittered the fur parts of the outfit with crystal glitter from Prisma and the gold parts were glittered using Martha Stewart gold glitter, then I cut it out and attached it to the card using popdots. I used a piece of purple cardstock for the card to represent twilight, then used a light blue/gray cardstock that I embossed with the Cuttlebug and the snow embossing folder. The snow drift was created using a piece of the purple cardstock and a piece of white that I "stamped" using a glue stamp pad and then embossed with some "Winter Wonderland" embossing powder from Stampendous, it is attached using pop dots. The sentiment is from Papertreyink's Believe set and it is matted with the purple cardstock and stamped on that wonderful white cardstock I get from "Stamper's Paradise" in Marietta, GA (I stocked up when I went this year) , the sentiment was stamped with Versamark ink and embossed with some gold embossing powder. This card has several layers and elements and I keep challenging myself, wait until you see what is coming! (tease! LOL)

A close up view.

04 November 2009

One stamp - 4 Cards

As much as I love to make cards, time is an issue. I also love to make lots of different cards but to save on time I will stamp the same image several times. The 4 cards I am showcasing today are all the same stamped image (Hero Arts CL110 Many Blessings ) all 4 of the images were colored with Copic markers, I do wish I had used some different colors, Oh well, next time! I have noticed that most of my cards tend to be red, it is my favorite color, but I am really trying to branch out and you will see some different colors and more elaborate cards in the days to come. (I am really trying to challenge myself to use more layers and patterned papers.)

This card was made using red cardstock from Archiver's and white shimmer paper from The paper Company that I ran through the Cuttlebug using the snowflake embossing folder. I cut out the stamped image using the circle nestabilities and then used a piece of red cardstock that I cut out using the Cuttlebug and the scalloped circle Nestabilities. The ribbon is from my stash and the sentiment is stamped with clear Versamark ink and embossed with red glitter embossing powder. The mat for the sentiment I kind of created using a piece of the red cardstock and clear Versamark ink and I inked the entire piece then embossed it with the red glitter embossing powder. This is an easy fun card and it is cute!

This card is one that I had made part of it last year (the card and the vellum with the eyelets part) and I drug it out and added the snow family image to it with some ribbon to finish it. The Snow Family and the red mat (the same red cardstock from Archiver's) were cut out using Nestabilities and the Cuttlebug. I did add some jewels as dots for the "i"s to add some bling!
This card is made from the red Archiver's cardstock (I bought two packages of 10 pieces while I was in Atlanta) and I used a piece of white shimmer paper (The Paper Company) that I embossed with the Cuttlebug snow embossing folder and then I Glimmer Misted it (I love Glimmer Mist! LOL) with gold GM. I added a gold bow and used some Gold glitter paper to mat the sentiment that was stamped with Versamark ink and embossed with gold embossing powder. I cut out the stamped image and the mat with Nestabilities and the Cuttlebug.

Last but not least! This card is not red!! LOL I used green cardstock from Archiver's (I bought two packs of a dark green like the red) I used nestabilities to cut out the stamped images, including the sentiment and the mats for both. the ribbon is from my stash and I added some bling in the form of clear jewels in the center of some of the snowflakes. The background paper is white shimmer paper from The Paper Company and it is embossed using the Cuttlebug and the snow embossing folder.

All four of these cards are similar and use the same elements but they are all different. It saves time to use the same stamped image on several different cards and well as the same elements but as you can see I made them all slightly different. Enjoy and go create something, even if it is only dinner! LOL

24 October 2009

Christmas Forest


This card I created at an Archiver's card class a few years ago, I have since created several similar cards. The stamps used are all Hero Arts, with some jewels and Versamark white ink for the borders, the trees were stamped, colored and then glittered. The sentiment is a different stamp so this is a layered image, then matted on green shimmer paper (from The Paper Company) and then put on the card with pop dots. I have made several cards this week but I have yet to photograph them so this is my blast from the past!

22 October 2009

Frosty's Warmest Winter Wishes


This card was so fun to make, I have been on an embossing kick since I took the card class at Archiver's in Atlanta. I used a snowflake stamp from Stampin Up that I stamped in Versamark clear ink and embossed with Stampin Stuff's Stardust embossing glitter. The paper is all from Archiver's, the sentiments stamp is a Hero Arts clear stamp and the snowman stamp is from the Stampin Up Frosty stamp set. The gemstone buttons are Hero Arts. I love the simple sparkle-ness of this card. Have fun creating, later I am creating dinner! LOL I am not sure if I will get any stamping time today but rest assured I have plenty of cards to post for the next few days! Thanks for looking and please post any comments! (I love comments)

21 October 2009

Warm Winter Wishes


This card is a simple one I created using the Darcies set JCSoo62, this stamp set is really cute and there are lots of card possibilities with it. The card stock is from Archiver's except for the polka dotted card stock, which is from my stash so who knows where I got it from. The snowman is colored with Copic markers and the pom pom on top of the hat has some "fuzz" on it that is heat set. The snowflake brads (these are metal) are also from my stash and I have had them for years in a Plano organizer box so again I have no idea who makes them but they are really fun and cool! By the way, the sentiment is from the Darcies set as well. I am trying to make my cards more elaborate (not this one) and I am trying to challenge myself to use patterned paper, this is hard since I do not have a craft store in my area, I am having to try to find stuff in my stash to use, so bear with me as I try to expand my horizons in the card making world. LOL

20 October 2009

Ho Ho Ho


This card is one I made using Our Craft Lounge's Reindeer Kisses stamp set. I really love the Our Craft Lounge stamp sets, check them out, many are on sale at www.iheartpaper.com. The red and green papers are from Archiver's and the gold is from my stash, as is the ribbon. I used some "snow" from a pen that puffs up when you use a heat gun on the fur of Santa's outfit and the Christmas tree ornaments are silver and gold nail heads that I bought at Hobby Lobby. The rest of the sparkle in Santa's outfit comes from some Sakura gel glitter pens. This was a fun card.

17 October 2009


Hi Everyone, Today's card is simple yet elegant. It was inspired by one of the Archiver's cards I made in the workshop I attended while in Atlanta. The A4 sized card was made using Archiver's Dark Green cardstock (I bought a pack of 10 pieces), the red circles are also Archiver's cardstock and the white shimmer paper is from The Paper Company. The stamps are from Stampin Up and Hero Arts and they were created using Versamark ink and gold and silver embossing powder, I also stamped some of the snowflakes onto the green card using the Versamark ink to create a watermark effect. I used some jewels and nail heads that I had in my stash to finish and embellish the card. I am not sure where I got the sentiment stamp but I thought the card, while simple, ended up looking elegant. I really want to challenge myself to make more elaborate cards and to use some patterned paper, so be on the lookout! LOL

15 October 2009

Reindeer Friends

This is the cutest stamp set, it is from the Reindeer Kisses stamp set from Our Craft Lounge, I discovered Our Craft Lounge when I was at Archiver's in Atlanta and I bought 6 different sets and plan on acquiring three more sets soon! (sshhhh, don't tell Gene LOL) This card is a simple one using Archiver's Dark Green cardstock for the A4 card and the red mat is also Archiver's cardstock, the silver paper is some from a gift pack from Creative memories (thanks MJ) (I dearly love that silver paper but I don't think I have anymore, how sad!) The sentiment is also from the Reindeer Kisses OCL set. I colored the reindeer with Copic markers. The sentiment on the inside of the card is a Hero Arts clear stamp embossed with some silver embossing powder. Please leave your comments, thanks for looking.

14 October 2009

It is looking alot like Christmas around here...

Todays card was inspired by one I did at the Archiver's class that I took in Atlanta. I will post the four cards we made soon. (I haven't taken their photos yet) The class was all about embossing along with a few other techniques. I used some Gold paper is from Archiver's for the A4 sized card and a piece of silver embellished paper that is from a freebie set by Creative Memories (thanks Mari Jose), the navy paper is from my stash, origin unknown. The stamped image is a Stampin Up stamp. The tree was stamped with Versamark clear ink and then gold and silver embossing powders were used (pouring a little of one then tapping it off and then pouring a little of the other then tapping it off so that the two colors and mixed on the image but not wasting or mixing in your containers) then heat embossed. This is a fun and very simple, fast card. The sentiment on the inside was embossed with Gold embossing powder and heat set. The sentiment is from Hero Arts.

13 October 2009

Christmas


I am working on my Christmas cards, I have made 8 so far and have about 42 more to go, I make lots of different ones. I try to make a few each day as Jeremy naps. Here is todays featured card. The stamped image is a Darcies JCS0062 stamp set that I bought at Rubber Stamp Fantasies in Marietta, GA. I used a background stamp of stars (not sure where it came from, it has no markings) I stamped it using Versamark clear and embossed it using some clear glitter embossing powder. The papers are from Archiver's and the sentiment inside is also from the Darcies set. The image is colored using Copic markers. The inside is also stamped with a swirl stamp from SU and stamped with the Versamark ink and the clear glitter embossing powder. Don't forget to leave your comments.

12 October 2009

This one is for Mari Jose


I couldn't resist posting this card. The stamps are Stamps by Judith, my friend Mari Jose told me about her and then I realized I had a few! I bought a few more (and ordered a few more) while in Atlanta. I used the Tree for all Seasons and a few stubbies. I used a Sakura gel pen to add glitter to the bulbs and to the star. The paper is Archiver's paper and the sentiment is a Hero Arts stamp, I used Versamark clear to emboss the entire surface of the sentiment, I like the look, it is different. This was a fun card and I want to make a few more. Please post comments!! I like knowing that people are looking! LOL

Back at last!!!


My life is no longer my own, with my Grandson Jeremy. I spend most of my time with him and it is such a joy. My Husband and I just returned from a week in Atlanta, it was business for him and craft shopping and a class at Archiver's for me. I am so excited about card making again. Here is a Halloween card that I made from supplies I had on hand, the stamp is a Daisy Kingdom stamp that I have had forever, it had never been inked. The stamp and mat are cut out using Spellbinders Nestabilities and the black "lace" was made using a Martha Stewart border punch. I have lots more to post in the next few days. Please post comments!

22 May 2009

Bob the Shaped digi card

Here is the Bob the Builder card I promised. This is a free digital stamp, it is actually a coloring book image that I resized in Photoshop CS3, but Michelle, my daughter, assures me that the resizing can be done with Word or other word processing program. I sized the image to be approximately (slightly smaller) the size of half of an 8.5 X 11 sheet of paper. I situated the image on the right hand side of the stamping quality paper and printed it with my Canon inkjet printer. After the image printed, I colored it with my Copic markers and then scored the card so that my score line was hitting at Bob's elbow and left side of his shoe so that I would have a hinge. I then cut the folded image with good scissors. This is a really cute card for a little child. The website that I found the image is www.coloring-book.info/coloring/
This is a fun site to play around in.


Here is another card, made the same way that my daughter Michelle made, she had a fun time making this one and asked me to include it on my blog! Here ya go, Chelle. This image came from "The Littlest Petshop" coloring book.

21 May 2009

Monster Card - Digital stamps

Hi all, This is my first foray into the world of digital stamps! I found this cute monster on http://fred-she-said.blogspot.com, it is a freebie. I thought he was so cute and really fun to color with my Copics. I used paper from two different Debbie Mumm paper stacks. I used my nestabilities Large Labels for the monster image and nestabilities rectangles, both regular and scalloped for the sentiment. The sentiment stamp is from hero Arts "Anytime Messages" (CL129) and the ribbon is American Crafts. This was a fun card and I really like the fact that digital stamps are resizeable to better fit any project! (Be on the lookout for a special Bob the Builder card that I have dreamed up using a digital stamp I found!)((Of, course I have to see what Bob looks like in color! LOL)) Don't forget to leave me a comment, Please!! :-)


18 May 2009

Please

Hi Y'all,
I know that there are several folks who like to views my blog because sometimes y'all will mention it, please leave nice comments (I don't want mean comments! LOL) I always wonder what everyone thinks.
Thanks,
Tammy

Here is a new photo of Jeremy taken a few days ago, he is such a joy!

Cupcake Birthday Card


I have several new cupcake stamp sets (purchased in my marathon Atlanta craft shopping excursion) This card was a fast fun card using the "Birthday Cupcake" Inkadinkado stamp set for the cupcake and Hero Arts "Birthday Messages" (CL 139) clear stamp set for the sentiment. I used Momento ink and some Gelly Roll Stardust pens to add some glimmer to the cupcake. The ribbon and the cupcake brad (isn't it just too cute??!!) are from my personal stash. I used a premade card bought from Michaels (I am trying to use these up), the bright pink paper was some from my stash and the cute gingham paper is from Debbie Mumm (for Joann's Fabrics and Crafts) Nursery Rhyme paper stack. I used my Spellbinders nestabilities and a Martha Stewart Punch. This was a fun card using some of my new tools, I had a great time creating this card.

16 May 2009

Pirate Thank ye card

This was a real quicky card that I created to give to a friend who loaned me 10 bucks when we were out shopping! (Thanks Friends) I used a stamp from Stampin Up's "Ahoy matey" Stamp set and I colored it with Copic markers and Atyou Spica Markers for the brass on the treasure chest. I used some printer paper that looks like parchment that I tore and then inked the edges (not neatly on purpose) with Momento ink in brown. I hand wrote the sentiment in Pirate speak since I didn't have a stamp that worked. My friend loved the card so I am happy with that!

15 May 2009

The Train Card


Gene and I went to Atlanta, he went for business and I went to shop for craft supplies! LOL Here on the Outer Banks we do not have a craft store. One of the many many things I bought was a Martha Stewart Train border punch that you see along the top of this card.(I bought 9 different MS border punches so you will be seeing more, I used one on my Mother's Day card too) I think this card is so cute, the stamp is from Hero Arts "Precious Baby" set (CL264) and I colored it with my Gelly Roll Stardust pens. The striped glitter paper is from a Debbie Mumm stack that I purchased at Joann's and the orange is from my stash, the card was a pre-made one from Michaels. The ribbon is from Archivers, I do not know what brand though. The brads are also from my stash.

A Pretty Little Girl

This card was so much fun to create The stamp is from Stampin Up's "Summer By The Sea" stamp set (Have I mentioned how much I love this set?) She is colored with Copic markers and matted with papers from my stash. I used a pre-made card that I purchased at Michaels. The ribbon is from Stampin Up (I believe). I did not put a sentiment on this card, I will customize it for whatever occasion I decide to use it. I do like to make some cards without sentiments and add them at the last minute that way when I am short on time (which is often) I can spend a minute or two, add a sentiment and then I have a nice handmade card to send off.


14 May 2009

One more for today!

This little card is a great card for a little boy (I seem to be into little boy cards since having a Grandson) There is no sentiment inside since I thought I would customize it for whomever I decide to sent it to, I feel like it would be a great birthday card, welcome to the new little boy etc. The snail stamp is from Hero Arts "Precious Baby" set (CL264) and the giggle sentiment is from the Fiskars "Love" Clear stamps set, the snail is colored with Copics and I used my nestabilities for the snail and the mat. This Fiskars set is really great with 36 different sentiments and they are fun. The ribbon is from my stash as well as the brads. The paper is from the Debbie Mumm Stack.

Boy at Beach Birthday card

This card is one that I love, it is a stamp from the Stampin Up "Summer by the Sea" set, (I love all of the stamps in this set.) The little boy is colored with Copic sketch markers. The papers are ones I had in my stash and the ribbon I had as well (sorry) I just love the colors in this card but this card gave me a fit, I made one and them decided that it would look better if I used my Cuttlebug and the florishes embossing folder that kind of looks like waves, then I used a different ribbon and hated the card, once I changed the ribbon, I was in love again! LOL

Finally Back!

It has been a long while since I have posted, a new baby in the house is keeping me especially busy! I have been making cards as I can carve out a few minutes here and there, I am posting a few, forgive me if I can't remember all of the "ingredients" of each card, plus I am using cardstock etc. that I have had in my stash for years.
This is the cards I made for my Mother for Mother's Day, I used Hero Art's stamp set "Happy Mom's" CL334, the image was colored with Copic sketch markers, the paper was from the Citrus Stack by DCWV the flower brad and pearls were some that I had. The papers had glitter and I glittered the bird's bodies with my Gelly Roll Stardust pens in clear.


This is the inside of my Mother's Day card, the sentiment came from the Hero Art's "Happy mom's" set as well as he rose, I thought it was a nice sentiment. My Mom loved the card so that is great!

08 February 2009

First Grandchild


I haven't made any cards in the last two weeks, I was busy putting on the baby shower for my Daughter Michelle and then two days later (I barely got the linens and serving dishes washed up and boom, we had a baby! Jeremy Gene was born 3 Feb 2009 at 11:27 am, weighing 6 lbs. 1 oz. and is 19 inches long, He is a peanut since my one and only baby was 8 lbs. and 9 oz. LOL We expected a girl but we are thrilled with Jeremy, he certainly was a surprise.

28 January 2009

New Rubber!!


It has been a very busy day around here and I finally got to sit and create a card using my new rubber that came today! I received the Doodle Factory Sweets N Hearts set from www.starvingartist.com it is a fantastic set. I also received some EZ-Cling so I can mount up the Bombshell stamps I received last week, so y'all be on the lookout for some new looks! Here is todays card, it was a Sketch Challenge from SCS (Splitcoast Stampers), I have never done a challenge or used a sketch so this was new for me. I Hope you like it, this is certainly "outside the box" for me! LOL

I used a premade card from those sets I bought at Michael's, some patterned paper from a stack, some solid from a stack and one of the stamps from the DF Sweets N Hearts Set. I colored the cupcake with Copics and included the colors I used (Finally), the sentiment is from the SU set Lots of Thoughts. The brad I have had in my stash and have no idea as to here I got it, sorry!

27 January 2009

"Any Occasion" card


This card was made using a premade embossed card I bought in a set from Michael's Craft Store, I used to different shades of purple cardstock from my stash (manuf. unknown) I cut out the ovals with the Creative Memories shape cutting system and the stamp is from SU Heartspeak set, colored with Copic Sketch Markers. The ribbon is SU.

Happily Ever After


This card is made using red cardstock and a precut pink single sided card that I cropped the three sides to leave the scallops only on the bottom, the stamped image is from the SU Summer By The Sea set and is colored with Copic Sketch Markers and matted with black cardstock (from my stash) The sentiment is from the SU Lots of Thoughts set. The ribbon is from a craft store, I have no idea from what company! I am trying to use what I have on hand when creating these cards, I also do not have a craft store in my area, I figure if I use up the things I have previously bought, then I can justify buying new stuff in the future! *grin*

Friendship


This is a card I created using a premade embossed card, SU ribbon, the stamp is from the SU Heartspeak set, the sentiment is from the CTMH From Me to You set and the cardstock is some that I have had and am using up. I colored the image with Copic Sketch Markers.

26 January 2009

Note of Love

This card was created using a pre made card I purchased (a set of 40) from Michaels that are embossed with different themes. I used a stamp from the SU Heartspeak set and the sentiment is from SU Lots of thoughts set. I colored the stamp with Spica pens so there is sparkle that doesn't show well in the photo. I then added the ribbon with is from SU.

This card was created using various papers from stacks I have acquired over the years, The stamp is from the SU Happy Heart Day set, the mouse is colored with Copics and Spica pens, the heart is done with the Spica so it is sparkly, but it doesn't show up well in the photo. I also used two decorative staples one says "sweet" and the other "Love" , I have also added a little bling with the gems.