20 November 2009


This was a really fun card to create. It is a wiper card and there are several video tutorials online if you want to make your own. I used Archiver's Dark Green cardstock for the main card body and the patterned paper is from K & Company it is their Peppermint Twist mat stack (I love this paper collection) and the stamped image is from Close to my Heart's "Gloria" stamp set. The nativity image is cut out with Spellbinders Nestaibilities Deckled edges set and the mat is cut with Nestaibilites scalloped Rectangles.

Here is the card completely open and you can see the edge, created with the EK Success snowflake border punch and the pop up is stamped with a Hero Arts stamp.


A view of the card as it starts to pop up.


A sneak peak of the inside.

You need to make one of these wiper cards they are really fun!!

I am finally back and ready to share the birthday card I promised. This card was created for a very good friend of mine, she loved it. The card itself is made with light blue shimmer paper from The Paper Company and the patterned paper is from the DCWV Citrus stack, the stamp is a Stampendous Cling "Changito Driver", the jewels are Sparkles from Close to my Heart and the ribbon is from Bo Bunny, their Cottage Kitchen collection. The sentiments (both inside and outside) are computer created. I really loved the way this card came out, I think it is super cute. I colored the image with copic markers and Sakura markers (the glitter) and then I used Close to my Heart Liquid Glass to give my car a clear coat (just like a real car LOL) I cut out the stamped image and the mats with Nestibilities Large labels.

The inside view.

10 November 2009

Ornaments


Ok, so I fibbed, the birthday card will be (maybe) tomorrow, it is still living on the camera card and since I am on my way out of town for a few days, I will have to get it online later, sorry. I made this card using Our Craft Lounge's "Jolly Ornaments" clear stamp set. I do like it but, have to do it over again I would have stamped the ornaments and then embossed them. I stamped the ornaments with Momento Red ink and then used Sakura Stardust pens to add the green. The Merry Christmas stamp is from OCL "Jolly Ornaments" set as well and is stamped with Versamark ink and embossed with gold embossing powder. The jewels are from my stash (I need to quit taking everything out of its packaging so I know who makes it) and I used a Sharpie fine line marker to draw the "cords" for the ornaments and to add the small dots. The card is white cardstock with a mat of the Archiver's red. This card is nice a blingy (is that a word? LOL).

08 November 2009

Santa Clothes line (again)


I just love this stamp, it is called Santa's Laundry and I just love this stamp! This card is one that I saw a sample of at Archiver's and they got the idea from the Northwoods Rubber Stamps Company (the maker of the stamp) This card is an A9 card (8.5 x 11 paper folded in half) I used some dark green cardstock from Archiver' for the card itself and a piece of the Archiver's red cardstock for the large "mat", the black belt is made with some black cardstock from my stash and the gold glitter "buckle" is from a sheet of gold glitter paper I bought at Hobby Lobby. The black center is embossed with gold embossing powder with a "believe" stamp from Our Craft Lounge's "Reindeer Kisses" set. The white glitter "fur" is some white paper I patted with the glue pad and then glittered with some Prisma Crystal Glitter, it was easy to make my own glitter paper! I colored the stamped image with Copic markers and cut it out and attached it to the card with popdots. Tomorrow card is a Birthday card, we will take a quick break from Christmas! LOL

07 November 2009

Let it Snow


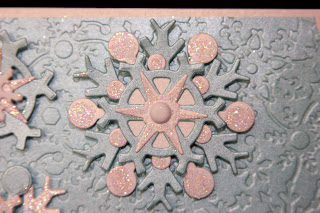
I love this card! It was actually very easy but time consuming because of glitter drying time. I made the snowflakes first they are made using the Spellbinders Shapeabilities Snowflake (this was NOT the new snowflake ones that are designed to be put together but that is where I got the idea!) I chose to use white and blue shimmer paper for the snowflakes and then used the white shimmer paper as the main card and the blue shimmer paper, embossed with the Cuttlebug and Spellbinders Snowflake Impressability embossing plate as the background paper. I used a circle punch to invert the corners and the sentiment is stamped on white stamping paper using a glue pad and then glittered with Martha Stewart glitter that closely matches the blue shimmer paper. I added crystal glitter to the snowflakes on the while parts using a glue pen and some Prisma Glitter. The small snowflake is held together with a snowflake brad and the two larger snowflakes are held together with white brads from making Memories. I attached the snowflakes using popdots.

Here is a close up view.

06 November 2009

O Come Let Us Adore Him


I have said that I am really trying to challenge myself and this card is one of the results. I love the way it turned out. The Stamp Set is the "Let Us Adore Him" stamp set from Close To My Heart. The card itself is Antique Gold shimmer cardstock from The Paper Company and the patterned paper is from Basic Grey's Wassail 6x6 paper pad, the green cardstock is from Archiver's and the white is the white stamping paper I get from Stamper's Paradise in Marietta, GA. I stamped the image and the sentiment in Versamark Dazzle ink in Champagne and embossed it with Zing embossing powder in Brownie (color), by American Crafts. The ribbon is by Making Memories, it is from a 9 color selection card in Celery. I also stamped a sentiment on the inside of the card, all of the stamps are from the "Let Us Adore Him" stamp set. Please don't for get to leave comments, either here, Facebook or email me. I love to know what you think. My email is otrbanks@earthlink.net, just put blog in the subject line. Have a great crafting day!!

05 November 2009

Santa's Laundry


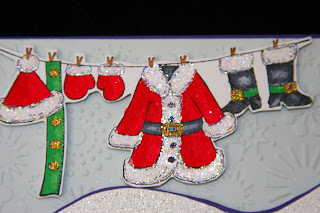
This is a super cute Northwoods Rubber Stamp, "Clothes Line" that I picked up at Archiver's in Kennesaw GA. I created this card by stamping the image with Momento Tuxedo Black ink and coloring it with Copic markers, I glittered the fur parts of the outfit with crystal glitter from Prisma and the gold parts were glittered using Martha Stewart gold glitter, then I cut it out and attached it to the card using popdots. I used a piece of purple cardstock for the card to represent twilight, then used a light blue/gray cardstock that I embossed with the Cuttlebug and the snow embossing folder. The snow drift was created using a piece of the purple cardstock and a piece of white that I "stamped" using a glue stamp pad and then embossed with some "Winter Wonderland" embossing powder from Stampendous, it is attached using pop dots. The sentiment is from Papertreyink's Believe set and it is matted with the purple cardstock and stamped on that wonderful white cardstock I get from "Stamper's Paradise" in Marietta, GA (I stocked up when I went this year) , the sentiment was stamped with Versamark ink and embossed with some gold embossing powder. This card has several layers and elements and I keep challenging myself, wait until you see what is coming! (tease! LOL)

A close up view.

04 November 2009

One stamp - 4 Cards

As much as I love to make cards, time is an issue. I also love to make lots of different cards but to save on time I will stamp the same image several times. The 4 cards I am showcasing today are all the same stamped image (Hero Arts CL110 Many Blessings ) all 4 of the images were colored with Copic markers, I do wish I had used some different colors, Oh well, next time! I have noticed that most of my cards tend to be red, it is my favorite color, but I am really trying to branch out and you will see some different colors and more elaborate cards in the days to come. (I am really trying to challenge myself to use more layers and patterned papers.)

This card was made using red cardstock from Archiver's and white shimmer paper from The paper Company that I ran through the Cuttlebug using the snowflake embossing folder. I cut out the stamped image using the circle nestabilities and then used a piece of red cardstock that I cut out using the Cuttlebug and the scalloped circle Nestabilities. The ribbon is from my stash and the sentiment is stamped with clear Versamark ink and embossed with red glitter embossing powder. The mat for the sentiment I kind of created using a piece of the red cardstock and clear Versamark ink and I inked the entire piece then embossed it with the red glitter embossing powder. This is an easy fun card and it is cute!

This card is one that I had made part of it last year (the card and the vellum with the eyelets part) and I drug it out and added the snow family image to it with some ribbon to finish it. The Snow Family and the red mat (the same red cardstock from Archiver's) were cut out using Nestabilities and the Cuttlebug. I did add some jewels as dots for the "i"s to add some bling!
This card is made from the red Archiver's cardstock (I bought two packages of 10 pieces while I was in Atlanta) and I used a piece of white shimmer paper (The Paper Company) that I embossed with the Cuttlebug snow embossing folder and then I Glimmer Misted it (I love Glimmer Mist! LOL) with gold GM. I added a gold bow and used some Gold glitter paper to mat the sentiment that was stamped with Versamark ink and embossed with gold embossing powder. I cut out the stamped image and the mat with Nestabilities and the Cuttlebug.

Last but not least! This card is not red!! LOL I used green cardstock from Archiver's (I bought two packs of a dark green like the red) I used nestabilities to cut out the stamped images, including the sentiment and the mats for both. the ribbon is from my stash and I added some bling in the form of clear jewels in the center of some of the snowflakes. The background paper is white shimmer paper from The Paper Company and it is embossed using the Cuttlebug and the snow embossing folder.

All four of these cards are similar and use the same elements but they are all different. It saves time to use the same stamped image on several different cards and well as the same elements but as you can see I made them all slightly different. Enjoy and go create something, even if it is only dinner! LOL